This piece is inspired by the king protea flower. As it will be seen later,I integrated weaving within the petals to create an interesting visual texture. My work can be viewed as personal adornment when worn on the body as well as a visual artefact when off the body.
INSPIRATION
The way in which the petals overlap one another was what I found interesting. I wanted to incorporate that somehow.
I used the shape of the protea's petals to come up with the shape of the top of the ring and the stand
THE RING
The frame of the petals are made of 1.5mm thick square silver wire. The four petals are soldered together at the ends. I made 2 sets of these.
The petals are then domed. This is what it looks underneath.
This is what the domed petals look like from the top.
After having looked at various way of how the petals will be positioned on one another I decided on the position above.
The weaving stitch I used is the "inhlandla" stitch. This is the stitch that I have used in the majority of my work. It is the neatest stitch and I achieve a tighter fit between wires.
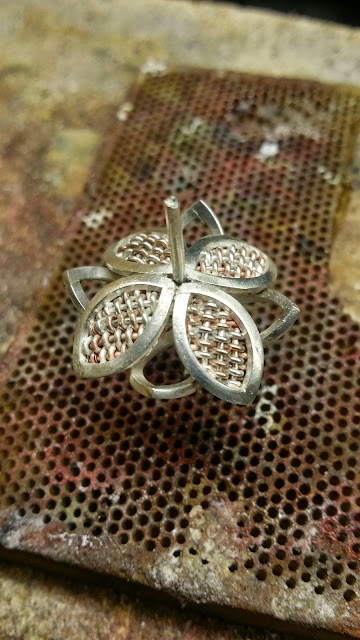
I sawed the woven strip into the shape of the inner petals and soldered them in place.
The second petal with the woven inner petal soldered in it.
The third petal with the woven inner petal soldered in it.
The fourth and final petal with the woven inner petal soldered in it.
The top view of the petals in position. I thought of placing woven petals in the bottom silver petals like I did with top but that would disrupt how the ring rests on the stand at the end.
Instead of just soldering the petals to one another, I also inserted a 1mm thick wire rod in the middle of the petals.
I melted the tip of the wire that is coming through the top of the petal to create a ball (As pictured above) that can be used as a handle. I then soldered the bottom of the wire to the bottom of the bottom petal (This cannot be seen here).
The final ring after soldering the shank.
THE STAND
The frame of the stand petals are made of 1.5mm thick square silver wire, as was the case with the ring petals I made earlier. The four petals are soldered together at the ends.
I made a ring and then I soldered the four petals equally around it. The ring in the middle is the base of the stand.
I domed/bent the petals equally until they aligned with the petals on the ring. The aim is for the tops of the petals to fit into the petals on the ring. This will be seen below.
Top view of the final ring and stand when they are positioned in place.
 |
| The ring stand needed some more visual weight so I added more petals. The petals will be layered on one another. |
Side view of the final ring and stand when they are positioned in place.
The purpose of my work is to create jewellery that can assume the role of personal adornment when on the body as well as a visual artefact when it off the body (Quickenden 2000:1).
CAD Process
The following series of images shows the steps followed in CAD leading up to the final rendered product.
I drew the petals using curves. I then extruded the curves to create what's pictured above. Each petal was bent to resemble what it would look like in person.
I drew the weaving using the interpolate curves and I solidified them using the pipe tool. I repeated this and arranged the piped wires as they would be if they were woven.
I drew the shank using the circle tool and I offset the inner circle outward to create the thickness of the shank. I extruded the two circles to create the shank.
The same method used to create the ring's petals was used to create the stand. I arranged the petals in a circle so that they align with the ring's petals.
Pictured above is the ring and the stand separately.
Pictured above is the ring and the stand when they are positioned in place
CAD Renderings
The following three images are the final rendered CAD images of the protea flower inspired ring and ring stand


